Students are having a great time creating and editing Anti-Bullying movies.
- Motivational/Inspiring video for someone experiencing bullying
- Anti-Bullying Campaign
- Characteristics/Personality traits of someone who stands up to bullying
- How you would end bullying in Your school
Editing and Special Effects fabulous! We got taping/drama part done super fast. Kids had oodles of fun editing - adding music, transitions, title, inserting videos, split screens. Just viewed near final products. Kids felt proud of themselves - professional looking and sounding.
Students need to go back and play with music volumes, professional credits.
BEWARE - GREAT ADVICE
Kids had "Peterborough" show up in their title. The 'locator" - which on so we can find our i-Pads, needs to be turned off for editing. There is a way of turning this off so it does not automatically show up on the screen. Go to Settings...privacy...location services...toggle off i'movie. This should solve the problem!
Obervations
Boys tend to be more focused on the technical piece. They needed pushing to get the dramatic/artistic pieces done. Girls tend to be more focused on the drama, and needed pushing to get the editing pieces done.
Still editing. Look for fascinating videos attached to my next blog.
Still loving "Explain Everything" as a quick way to check our thinking before a math summative. Catching the odd misconception! Great stuff! Kids are getting fast at creating and sharing slides.
Still having fun. iPads are becoming a more functioning tool and less a play toy!!!
Showing posts with label Assessment. Show all posts
Showing posts with label Assessment. Show all posts
Monday, 14 April 2014
Tuesday, 1 April 2014
Nearpod ~ engage your students
This past weekend I found a new app for student use: Nearpod.
http://www.nearpod.com/
App: https://search.itunes.apple.com/WebObjects/MZContentLink.woa/wa/link?mt=8&path=apps%2fnearpod
This app is great for the class sets of iPads and BYOD. I say BYOD because it is available on windows, android and iOS devices. It is free to download to view the presentations (teacher made). So, if you get your students to download the app onto their device, they can follow along and participate too. I downloaded the app onto the 15 iPads that I have been assigned to. The shared use went really well.
Perks:
- allows you to present assessments (open ended questions, m/c questions, t/f questions)
- allows students to submit drawn answers
- allows you to play videos (.mp4, .mov, .mpg, etc...)
- allows you to upload existing lessons (.ppt, .pdf)
- allows you to add images (.png, .jpg)
- you build/edit the presentation files with a web browser (on iPad or computer)
- the app collects data (student responses) that can be viewed later.
- as activities are occurring, you can monitor the % of student completion and cue those not done.
- you can display student responses/illustrations to prompt discussion
- you can load content from google drive, dropbox, box, or the computer that you are using
Cons:
- $$$$. The app is free. 90% of the features are accessible for the free account. BUT the paid part allows for a couple more features ($12/month; $120/year).
- Paid features:
- host a webpage within the presentation
- "homework" feature where students can (re)do activity/presentation at home or at their own pace.
- more space for presentations
Video:
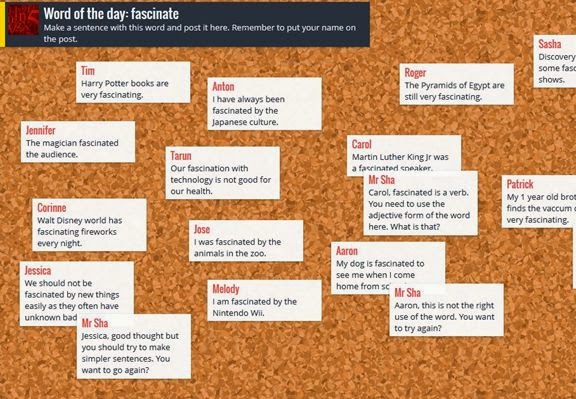
Assessment image from a presentation/activity in my class:
Monday, 31 March 2014
Uploading PDF's: Part 2
Uploading PDF's Part 2: To Google Drive from a computer
The cool factor continues. Now that I've stumbled upon uploading PDF's from the internet to Google Drive (from an iPad), I must be able to do it with PDF's on my computer. With a little determination, I was able to conquer my quest. Unfortunately it was a two step process, and took a little bit longer. If there is a faster way, I would love to learn.
- Create a folder in Google Drive to save the PDF
- Select the upload button (next to the Create button, there is an arrow pointing up)
- Select "Files or Folders"
- Select the desired PDF from your desktop/computer etc...
- Click open
- Select the link (file), when upload complete (a window will pop up bottom, right corner)
- Select move to folder
- select the folder you've created
- selectt move
I created a folder for my GB+ reading assessments (this is the French Immersion equivalent to F&P reading assessments). The PDF's (GB+ reading assessment sheets) came on a disc with the kits, which I uploaded to My Drive using the process above. Then, I followed the steps from my blog Uploading PDF's in Explain Everything & Google Drive: Part 1.
Now I have all the assessment sheets for each reading level stored on my Drive. To assess my students, I can open the PDF in Explain Everything. To begin I can select record. I can use the pen to tick off correct words, circle ones that were forgotten, add things etc... and at the same time, I have a voice recording of how the student actually read the book!!!
Again, when complete, upload the presentation to Google Drive as a video record. Share with students so they can see and hear how they read. Share with your resource team, parents and teachers for the following year.
Uploading PDF's Part 1
Uploading PDF's in Explain Everything & Google Drive: Part 1
Though my inquiry is in math, I have been exploring new ways to utilize this wonderful piece of technology across the curriculum.
I was playing around with the Google Drive App and discovered a hidden button... in the top right corner. With a slight touch of my finger, a tab appeared asking which app I wanted to open the PDF with (the text that I was reading at the time). A selection of apps were displayed (already downloaded on the iPad). So, as I grew curiouser, I selected Explain Everything and BOOM! Each PDF page became a slide in Explain Everything. This was awesome and just like that, I solved my problem with journaling on the iPad vs a paper and pencil task.
Our learning block at the time was "Les Olympiques". I found these great journaling prompts on a website, and displayed it on our Smartboard as our shared reading. The students then had their own copy saved in Explain Everything and were not only able to journal daily, but then recorded what was written. Très cool! Once we were done this mini journal, the students/the teacher, uploaded each one to Google Drive, which converted it to an MP4 video file.
 |
| Example of a slide in Explain Everything |
Saturday, 29 March 2014
Assessing Learning Skills and Work Habits
Honestly 'marking' and evaluating the work habits and learning skills can be difficult to do properly at the secondary level (I have no idea what it is like at the elementary level, but this might be true there too). While doing a course recently, I had to do something about assessment through technology. So I had an idea, assess the learning skills and work habits!
Its just an idea, but I have included the rubric that I made for the assignment if it gives you ideas for making your own tool for this or just use the one here:
https://drive.google.com/file/d/0B56ahhzE5dr7WHYzTXJVODctcFU/edit?usp=sharing
Its just an idea, but I have included the rubric that I made for the assignment if it gives you ideas for making your own tool for this or just use the one here:
https://drive.google.com/file/d/0B56ahhzE5dr7WHYzTXJVODctcFU/edit?usp=sharing
Friday, 28 March 2014
Struggling with Digital Submissions...actually getting them I mean
This year has been a wonderful year of learning. I have gone from a teacher afraid of Google Drive to a teacher who uses it a lot for sharing and storing information. I have gone from being an Apple newbie to feeling naked without my iPad. I have gone from a teacher who didn't even know Explain Everything (EE) existed to a teacher who appreciates the powerful impact it has on the learning experience for the students. Throughout it all, however, there is a constant, underlying struggle or barrier to feeling completely successful in this technology inquiry.
Students are using the minis to generate EE projects but, the process more often then not, seems to stop short there. During the creation, I witness first hand the learning. When we share our efforts using the Reflector program I am always impressed. But, I am seeking greater success in being able to receive digital submissions for evaluation and feedback.
The students all have their own "Hand In" folders. The intent is for students to place their files into this folder when they were handing something in. It makes sense, but it doesn't happen. Students are indicating it has been "Handed In" so what could be happening?
Possibility #1 (Which I previously blogged about)
When saved into google drive, students haven't ensured they are logged on to their own account. The file is saved but into a place they cannot regularly access. Are they still forgetting to do this?
Possibility #2
If there isn't a file already in the "Hand In" folder, when using a mini it is not possible to save into that folder. Students thought they were saving into the appropriate folder but ultimately they were not saving at all. I could have solved this problem by booking into the computer lab and having students save something, anything, into the folder but I just created a google doc and saved it where necessary. This really isn't a problem anymore.
Possibility #3
The EE project is there, I just don't recognize it because of the way it was named. Solution: be very specific about the name students need to use when saving their files and having them also include the names of all students who shared in it's creation. Looking at the"Last Modified" date can also be helpful.
So why, when students are instructed to hand in their files, when I check, they are not there? What am I missing? What do I need to do differently?
I think part of the issue is that when a student hands in a project I am not able to check right away for submission. There is a delay before it "shows up" in the folder. With hard copy submission, it is physically in my hand or it isn't; I can easily know, as we all do, before the student leaves, whether or not I have their work.
The struggle continues. I do and will continue to battle on because on the occasions that I am able to evaluate and offer feedback it is awesome! I dictate my feedback directly onto the EE project and share it back with the students. Cool!!! (If only I could do this in my comfy chair at home instead of requiring the high speed internet available at school.)
Suggestions welcome!!!!
Tuesday, 25 February 2014
Using Explain Everything to Accommodate for Assessment
The facts:
7/8 Science class
34 students
13 with IEPs requiring accommodations and/or modifications
current unit - heavy on language
The assessment:
A quick multiple choice, true false, matching, short answer quiz
The dilema:
How am I going to read to and scribe for 13 students? (Any attempts to clone myself have been unsuccessful.)
The answer:
Explain Everything!!!!!!
I inserted pictures of each of the questions from the assessment onto an Explain Everything slide and recorded as I read and paraphrased questions.
What I learned/realized:
I thought I was brilliant to have students record their answer on the .xpl but found that unless it was a multiple choice question the spacing was too small to write; a particular problem for students with fine motor skills issues. Next time I will provide students with a hard copy to record answers on or, given the style of this quiz, I would set up the clickers to input the answers.
For assessment requiring written responses students can dictate their answers. I use this feature a lot when giving feedback on .xpl
Student Feedback:
100% positive! They L-O-V-E-D it! (Although most requested a stylus for next time.)
Friday, 21 February 2014
Padlet
Padlet is an amazing learning tool. It is a website that allows anyone that types in the identical URL to write on a shared wall in real time. Padlet does not require a login or password; anyone can create a wall and anyone can write on it by using the unique URL given to the wall creator. One of Padlet’s greatest strengths is that it is relatively low-tech. It is not an app, any device that has an internet browser can interact with it. Padlet allows the teacher to export the wall in a variety of formats. As an assessment tool rather than taking an anecdotal record for participation it records what students have contributed and can be saved instantly to a single file for participation marks or levels if the response requested requires critical thinking. Padlet’s other great strength is that it gives students a forum to contribute towards a collective lesson without speaking in front of their peers.
One of the unique features that the app has is that the person who established the wall can set the background to any image. Students could then look at the image and describe an emotion or insight that the background has inspired. This image could also be a math problem to which students can submit an estimate or answer. The could also collectively annotate the work sample as part of consolidation. This app is also ideal for the co-creation of an anchor chart. Teachers could divide the class to limit the number of people working on each wall that they create or to have different themes for different walls. An example of this could be having half of the class work towards filling a wall with the positives of first contact for First Nations and the other half of the class working towards filling a wall with the negatives of colonization. Padlet allows for two organizational methods to be selected via settings. One is freeform which allows students to write anywhere they click, the other places each comment in order as it was made vertically. Padlet allows you to change to the latter after students have already made their post as a free-click comment to organize comments in a clear readable fashion.
A suggested accompanying app if students are using padlet with tablets is scan life (free). The wall has a share button which opens up a QR code. Once a student has scanned it they are instantly taken to the wall where they can open up the same QR code to bring to their peers. Where it may seem like an obstacle to get everyone to the same URL, the diffusion of using the QR code can happen very quickly. If older technology is being used the Educator can write the URL on the chalk board or e-mail it to students. That said it is highly unlikely but anyone could randomly enter that six digit code. It is for this reason that I would suggest turning on the moderator option (found under privacy in settings) in order to filter potentially inappropriate things from being posted by students in the class or others. With a moderator filtering what could potentially be posted on the Padlet wall students are provided with the opportunity to anonymously post questions which could be seen as a strength.
Padlet requires no login and an entire class can be working on the same electronic wall in real time within few short moments. As a teacher Padlet can be seen as an outlet allowing for independent thinking and allowing many students to express their ideas to the class quietly and simultaneously. All of these ideas can be exported neatly to a single file in a variety of formats to be read (I suggest switching the layout to “stream” for this) by the educator at their convenience rather than collecting 20 or 30 different pieces of paper. Padlet is a great tool that students can use on a wide range of technology.
Tuesday, 28 January 2014
Dance Units - iPads for Descriptive Feedback…and deeper understanding
by Donna Hannivan-Taylor
We have used video devices to provide descriptive feedback to students in the past, but iPads provide an opportunity for students to experience deeper understanding.
We have used video devices to provide descriptive feedback to students in the past, but iPads provide an opportunity for students to experience deeper understanding.
|
CRITERIA
|
|
Visible Effort
Do your best!
|
|
Be on Beat Practice
evident
|
|
Moves work with music & flow
--Unison
with other group members
|
|
Use a Variety of Elements—Speed, Weight, Relationships, Level,
Directions
|
|
Use a Variety of Elements—Body Parts used & balanced on +Shapes,
Floor Paths, Types travel (walk, run, skip, sidestep, crawl…)
|
|
Routine is original/ interesting
|
My goal was to get students more invested in stepping
outside their comfort zone of only using the typical dance moves they know
& enjoy. So, to begin the process I had them help develop the criteria that
would be used for evaluation.
Next, once the dance routines were done, the iPads were
used to video each group so they could compare their routines to the criteria for feedback. You can’t get any more descriptive than that!
Finally students videotaped their final product, then
used iMovie to voice over this recording, explaining exactly what they did
during their routine that demonstrated the evaluation criteria.
This step places the responsibility for demonstrating
learning onto the students. They
thoroughly understand the elements and what is expected of them &
Monday, 2 December 2013
Engagement Success (Students' and Parents')
Video Clips to Google Drive (Nov. 25)
Learning Goal: We are learning to add details to our writing (recount).
Strategies: We use the 5Ws to include Who, What, Where, When, Why and How.
We visualize and describe with words what we see in our head.
Background Info: The students used the 5Ws planner to determine details to include in their writing. The students also listed their main events, in time order. My discovery was that the students did not include the information in their planners in their recount. Sometimes students claimed they did not need to because it said it "right there" (on their planner).
Mini Inquiry: What will the impact of viewing a video clip of themselves reading their own recount be on their understanding the reader's perspective (not knowing the information in the planner), as measured by the accuracy and reflection in their self-assessment?
Student Engagement (Block 2 & 3):
Taking videos is inherently engaging, we had 100% eager participation. Uploading to Google Drive was a new experience for the students. They persevered and we had 100% engagement and success. The third and final step was to share their clip in Google Drive with me. By now it was third block and the same student who in block 1 (before iPads) claimed he was not doing any work today, said he was not going to share. Explaining that the only way I knew how to share his video clip on the Smartboard (partial truth) was for him to share with me on Google Drive, quickly brought him around. All students proudly completed the third step :)
Coincidentally, almost half of the class was absent this day. So the next day, we shared our video clips with the whole class and awarded each Google Drive Sharer with a Google Drive Expert Crown.
It was incredible how proud and engaged my "Experts" were in teaching the previously absent children! All students successfully uploaded and shared their video clip.
As far as the mini inquiry question, the process took a life of its own. They were so proud of their technology accomplishment that reflecting upon their writing was overshadowed.
The AMAZING part is that I had 3 parents visit me on different days after school to see their child's video. The students' excitement and crowns were the best "What I did at school" conversation starter. The next week I had a note in the agenda from one of these parents who explained how proud her son was to be able to share his school work with his father at home! That is the BEST parent involvement our class has had (so far) this year!!!
Here is one clip. Please remember that the video clips were never intended to be polished products but for the purpose of self-assessment.
Subscribe to:
Comments (Atom)